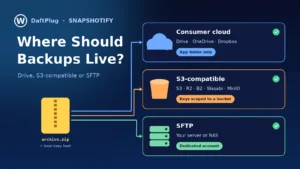
Most backup advice assumes the site is still there. You broke something, you restore, you carry on. The harder day is the one where there is nothing to restore onto: the hosting account is suspended, the server failed, or the provider closed. wp-admin is gone, the files are gone, and the only copy of your site is an archive sitting somewhere else.
This is a runbook for that day. It shows how to rebuild a WordPress site from a backup on a brand-new host using Snapshotify, the DaftPlug backup plugin, in the order you would actually do it. Everything about how Snapshotify backs up, uploads and restores comes from its documentation and the 1.4.0 changelog. Steps that are about hosting, DNS and general practice rather than the plugin are labeled.
Part 1: ten minutes of preparation, before you need it
A rebuild is only possible if the archive survived the host. These checks are worth doing on a normal Tuesday.
Keep at least one copy off the server
The Snapshotify cloud storage guide says it plainly: a backup stored on the same server as the site does not survive the failure that destroys the server. With Pro, scheduled backups can go to Google Drive, Dropbox or OneDrive, and since 1.4.0 also to Amazon S3, Cloudflare R2, Backblaze B2, Wasabi, DigitalOcean Spaces, MinIO, any other S3-compatible service, or SFTP. On free, the docs describe downloading archives manually as the same protection with more steps.
Know where the archives live
From the troubleshooting docs: Google Drive uses Snapshotify/<your-site>, OneDrive uses Apps/Snapshotify/<your-site>, and Dropbox uses its app folder. Each site gets its own folder named after its host. Do not reorganize those folders by hand. The plugin can only see files it created, so moving archives elsewhere makes them invisible to it.
Back up the whole site
For anything you might restore from, the docs recommend a full-site backup, and they list what each exclusion costs you. Excluding core costs you the ability to restore onto an empty server without installing WordPress first. Excluding media costs you your images, and a site restored without them is not restored. Excluding the database is almost never right.
Write down what the archive does not hold
Some files are never backed up, by design. The biggest is wp-config.php, which holds your database credentials and salts. A restore keeps the target site’s own file, which is what makes restoring onto a different server work. The same goes for .htaccess, .user.ini, php.ini, web.config and drop-ins such as object-cache.php.
General advice: keep a short note, in your password manager or project docs, of any custom lines you added to wp-config.php (for example WP_POST_REVISIONS or DISALLOW_FILE_EDIT), the admin login that exists in your backups, and the services tied to your domain, such as payment webhooks and Search Console.
Turn on failure alerts and test once
Turn on email notifications, at least for failures, so a broken schedule reaches you by email rather than on rebuild day. And follow the last line of the docs’ good practice list: restore one backup onto staging, once. It is the only way to know your backups work.
Part 2: get the archive
From Google Drive, Dropbox or OneDrive
Sign in to the provider’s website, open the Snapshotify folder for your site, and download the newest full-site archive to your computer. Downloading a copy does not move it, so the original stays visible to the plugin.
From S3-compatible storage or SFTP
Snapshotify 1.4.0 added a Test connection button for S3 and SFTP, then a way to list, download and restore those remote backups from settings. The docs do not yet say whether a brand-new install lists archives that a different, older install wrote. Try it after Part 3, but download the file directly from the bucket or server first, so you have a fallback either way.
Check you have the right file
A Snapshotify archive always contains database.sql and manifest.json, plus whatever was not excluded. The manifest records the WordPress version, the site URL and the table prefix, and the restore reads it rather than assuming. Name your backups for the reason you took them, as the docs suggest, and on this day you will know which one to pick.
Part 3: prepare the new host
General hosting steps first: sign up for the new hosting, add your domain, and make sure the new server can serve it over HTTPS. Then:
- Install a fresh WordPress. The migration guide asks for a working WordPress install with Snapshotify active on the destination. It does not need to be empty, because the restore replaces what is there.
- Install Snapshotify. The free version is enough. The FAQ confirms that backup, upload, restore and URL rewriting are all free. Pro is for backups that happen without you.
- Check free space. A restore needs roughly twice the archive size, because it extracts before it applies.
Restore onto the real domain, or a temporary one?
This decision changes what the restore does.
Snapshotify compares the site URL in the manifest with the destination. If they differ, it runs the migration steps: it rewrites around twenty variants of every address, including the JSON-escaped form that Elementor, Divi, WPBakery and Gutenberg store, deactivates login-URL changers so you can still find the login page, and deactivates SSL forcers when the destination is not on HTTPS yet so the site does not loop.
- Same domain, pointed at the new host (general DNS step): no URL rewriting is needed, and the restore behaves like a normal same-site restore. The docs note that a same-site restore never switches off your security plugins. That makes HTTPS on the new server important before you start, because the docs warn that an SSL-forcing plugin loops when the site is not on HTTPS yet.
- A temporary host address first: Snapshotify treats it as a migration and rewrites URLs to the temporary address. When you later move to the real domain, that is a second migration. The docs point out that a migration never modifies its source, so you can migrate, test and migrate again without risk.
If you can point DNS first, the single same-domain restore is simpler.
Part 4: upload and restore
Upload the archive
Go to Snapshotify > Backups > Upload Backup. Archives are uploaded in chunks, so large ones work within normal request limits. Once uploaded, the archive behaves like any other backup in the list.
Restore, and stay on the page
Choose the uploaded backup and select restore. The docs are firm about one thing: do not close the tab during a restore. A backup can continue in the background. A restore is replacing the site underneath itself.
The restore runs in a fixed order:
- Prepare. The archive is extracted and checked, including a free-space check. This is the last non-destructive step.
- Restore the database. If the fresh install uses a different table prefix, table names are rewritten as they land.
- Repair prefixed keys. Role definitions and user capabilities that contain the prefix are rewritten, so you are not locked out of wp-admin.
- Migrate URLs, only if the address changed.
- Restore files. Uploads, plugins, themes, other content, then core, last and in two phases so a different WordPress version does not fatal partway.
- Finalize. Maintenance mode is lifted.
From the database step onward visitors see a maintenance page. The 1.4.0 changelog adds that a restore now checks the imported database before switching it in, and leaves the site as it was if the import does not finish.
What stays from the new host
This is where the exclusions help you. The new host’s wp-config.php stays, with its own database credentials. Host-injected mu-plugins from the old provider, such as those from Bluehost, GoDaddy or WP Engine, are skipped, so you do not inherit a plugin you cannot remove. .user.ini is excluded because security plugins write an absolute path from the old server into it, which would make every request fail before WordPress boots.
Part 5: sign back in
A restore replaces the users table, so the account you created during the fresh install no longer exists. Snapshotify issues a re-login token valid for 30 minutes, so you land back in wp-admin. After that window, sign in with the credentials from the backup. If the backup is old, that may be an old password. With no working credentials at all, the docs suggest resetting the password through the database or WP-CLI.
Part 6: after the restore
Work through these before you announce the site is back:
- Re-save permalinks.
.htaccessis never restored, so if posts return 404, re-save Settings > Permalinks to regenerate the rules. - Check the front end and media. Pages built with a page builder and images are where problems show first.
- Clear caches. The FAQ says to clear your cache after a restore so old pages are not served.
- Put back your
wp-config.phplines. Use the note from Part 1. If you run Lightify, its cache status needs theWP_CACHEconstant, which lived in the oldwp-config.php. Lightify adds it automatically when the file is writable, or you add it by hand. - Reinstall an object cache, if the new host offers one. Drop-ins such as
object-cache.phpare bound to the server they were configured for and are never carried over. - Reconnect what is tied to the domain. The migration guide lists Search Console verification and payment gateway webhooks. On the same domain these usually keep working (general), but check them.
- Reconnect backups. If Settings > Storage shows a broken connection, reconnect it and confirm Backups Location, then switch scheduled backups back on.
- Take a fresh backup of the site on its new home.
If you run Progressify, the FAQ adds a bonus: push subscribers are not lost when you change hosts, as long as the database moves with you and the domain stays the same.
If something goes wrong
| Problem | What to do |
|---|---|
| Restore failed during Prepare | Site untouched. Fix the cause, usually disk space, and retry |
| Restore failed later | Retry the same restore. Steps are resumable |
| Stuck on the maintenance page | Wait for the 30-minute expiry, or delete .maintenance in the site root |
| Locked out of wp-admin | Re-run the restore so the prefix repair completes |
| Permalinks return 404 | Re-save Settings > Permalinks |
Free and Pro
The rebuild itself runs on free Snapshotify: upload, restore, URL rewriting and the re-login token. What makes the rebuild possible in the first place is Pro: scheduled backups, retention, and automatic copies to cloud, S3-compatible or SFTP storage. If your only backups still sit next to the site, our post on why a WordPress backup on the same server is not a backup explains why that offsite copy matters.
Snapshotify Pro is part of the DaftPlug membership, one license for Snapshotify, Progressify, Lightify, Generatify and Crownify. Plans start at $37.99 a year for one site and differ only in site activations, with a 14-day money-back guarantee. See the options on the DaftPlug pricing page.